Posts tagged ‘Dc Motor’

DC Motor Interfacing With Micrcontroller

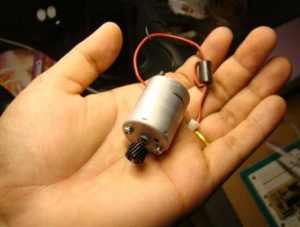
DC Motors are small, inexpensive and powerful motors used widely in robotics for their small size and high energy out. A typical DC motor operates at speeds that are far too high speed to be useful, and torque that are far too low. Gear reduction is the standard method by which a motor is made useful .Gear’s reduce the speed of motor and increases the torque.

Choosing a DC Motor Depends on application.Prefer following:

  • DCMotor with Gear head
  • Operating voltage 12V
  • Speed

Drive basics of DC Motor

Red wire Black wire Direction of rotation
Positive Negative Clock wise
Negative Positive Anti clock wise
Logic Logic Direction
1 0 Clock
0 1 Anti clock
Direction Pulse to
Clock wise A and C
Anti Clock wise B and D

Bi-Direction control of DC Motor

H-Bridge Circuit using transistors for bidirectional driving of DC motor. H-Bridges in IC’s to reduce the drive circuit complexity . L293D is a dual H-Bridge motor driver, So with one IC we can interface two DC motors which can be controlled in both clockwise and counter clockwise direction and if you have motor with fix direction of motion the you can make use of all the four I/Os to connect up to four DC motors. L293D has output current of 600mA and peak output current of 1.2A per channel. Moreover for protection of circuit from back EMF ouput diodes are included within the IC. The output supply (VCC2) has a wide range from 4.5V to 36V, which has made L293D a best choice for DC motor driver.
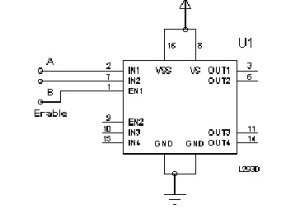
As you can see in the circuit, three pins are needed for interfacing a DC motor (A, B, Enable). If you want the o/p to be enabled completely then you can connect Enable to VCC and only 2 pins needed from controller to make the motor work.

**To Move the motor Clockwise And Anticlockwise,Must be use two separate Power source,one for microcontroller and another for driving motor with Driver IC.

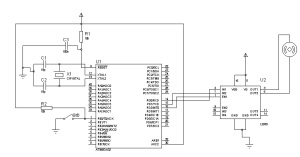
Here,i have used ATMEGA32 micrcontroller and  Code is written in C  using AVR Studio 5.0.

Source Code

/*
* DCMotorControl.c
*
* Created: 4/1/2011 12:08:10 AM
*  Author: sfg
*/

#include <avr/io.h>
#include <util/delay.h>

int main(void)
{
DDRD=0xFF; //PORTD declared as output
PORTD=0x00;
DDRB=0x00; //PORTB as input
while(1)
{

//Pin 0 of PORTB high,then Moves Clockwise
//A–1–PD0
//B–0–PD1
//Enable–1–PD2
if(PINB==0x01)
{
PORTD=0x05;
//_delay_ms(5000);
}
//Pin 0 of PORTB Low,then Moves AntiClockwise
//A–0–PD0
//B–1–PD1
//Enable–1–PD2
else
{

PORTD=0x06;
//_delay_ms(5000);
}
}
}
Circuit Diagram

Servo Motor Control Using Microcontroller

A Servo is a small device that has an output shaft. This shaft can be positioned to specific angular positions by sending the servo a coded signal. As long as the coded signal exists on the input line, the servo will maintain the angular position of the shaft. As the coded signal changes, the angular position of the shaft changes. In practice, servos are used in radio controlled airplanes to position control surfaces like the elevators and rudders. They are also used in radio controlled cars, puppets, and of course, robots.

The guts of a servo motor are shown in the picture below. You can see the control circuitry, the motor, a set of gears, and the case. You can also see the 3 wires that connect to the outside world. One is for power (+5volts), ground, and the white wire is the control wire.

Servo motor

So, how does a servo work? The servo motor has some control circuits and a potentiometer (a variable resistor, aka pot) that is connected to the output shaft. In the picture above, the pot can be seen on the right side of the circuit board. This pot allows the control circuitry to monitor the current angle of the servo motor. If the shaft is at the correct angle, then the motor shuts off. If the circuit finds that the angle is not correct, it will turn the motor the correct direction until the angle is correct. The output shaft of the servo is capable of travelling somewhere around 180 degrees. Usually, its somewhere in the 210 degree range, but it varies by manufacturer. A normal servo is used to control an angular motion of between 0 and 180 degrees. A normal servo is mechanically not capable of turning any farther due to a mechanical stop built on to the main output gear.

The amount of power applied to the motor is proportional to the distance it needs to travel. So, if the shaft needs to turn a large distance, the motor will run at full speed. If it needs to turn only a small amount, the motor will run at a slower speed. This is called proportional control.

How do you communicate the angle at which the servo should turn? The control wire is used to communicate the angle. The angle is determined by the duration of a pulse that is applied to the control wire. This is called Pulse Coded Modulation. The servo expects to see a pulse every 20 milliseconds (.02 seconds). The length of the pulse will determine how far the motor turns. A 1.5 millisecond pulse, for example, will make the motor turn to the 90 degree position (often called the neutral position). If the pulse is shorter than 1.5 ms, then the motor will turn the shaft to closer to 0 degress. If the pulse is longer than 1.5ms, the shaft turns closer to 180 degress.

Standard time vs. angle

Procedure

If you want to control your servo motor from a microcontroller,then you must follow-

bring high a digital port
wait between 1-2ms
bring low the same digital port
cycle a few dozen times per second


Here,i have used PIC16F887  microcontroller.Code is written in C using mikroC PRO for PIC.

Source Code

void main(){

int i;
ANSEL  = 0;                                    // Configure AN pins as digital I/O
ANSELH = 0;

PORTD=0x00;
TRISD=0x00;

while(1){

//Move Anti Clockwise direction
for(i=1;i<=500; i++){
PORTD=(1<<RD2); //output_high(PIN_D2);
delay_us(1000); //want servo to move to 0 degrees.
PORTD=(0<<RD2);  //output_low(PIN_D2);
delay_ms(20);

}

//Move Clockwise Direction
for(i=1;i<=500; i++){
PORTD=(1<<RD2); //output_high(PIN_D2);
delay_us(2000); //want servo to move to 180 degrees.
PORTD=(0<<RD2);  //output_low(PIN_D2);
delay_ms(20);

}

}
}

Circuit Diagram