Posts tagged ‘L293D’

DC Motor Interfacing With Micrcontroller

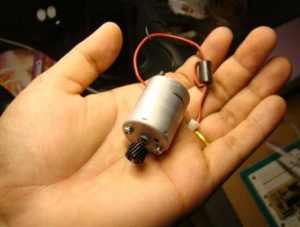
DC Motors are small, inexpensive and powerful motors used widely in robotics for their small size and high energy out. A typical DC motor operates at speeds that are far too high speed to be useful, and torque that are far too low. Gear reduction is the standard method by which a motor is made useful .Gear’s reduce the speed of motor and increases the torque.

Choosing a DC Motor Depends on application.Prefer following:

  • DCMotor with Gear head
  • Operating voltage 12V
  • Speed

Drive basics of DC Motor

Red wire Black wire Direction of rotation
Positive Negative Clock wise
Negative Positive Anti clock wise
Logic Logic Direction
1 0 Clock
0 1 Anti clock
Direction Pulse to
Clock wise A and C
Anti Clock wise B and D

Bi-Direction control of DC Motor

H-Bridge Circuit using transistors for bidirectional driving of DC motor. H-Bridges in IC’s to reduce the drive circuit complexity . L293D is a dual H-Bridge motor driver, So with one IC we can interface two DC motors which can be controlled in both clockwise and counter clockwise direction and if you have motor with fix direction of motion the you can make use of all the four I/Os to connect up to four DC motors. L293D has output current of 600mA and peak output current of 1.2A per channel. Moreover for protection of circuit from back EMF ouput diodes are included within the IC. The output supply (VCC2) has a wide range from 4.5V to 36V, which has made L293D a best choice for DC motor driver.
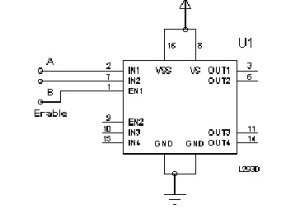
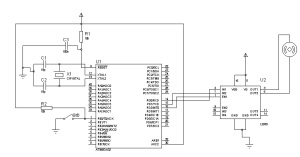
As you can see in the circuit, three pins are needed for interfacing a DC motor (A, B, Enable). If you want the o/p to be enabled completely then you can connect Enable to VCC and only 2 pins needed from controller to make the motor work.

**To Move the motor Clockwise And Anticlockwise,Must be use two separate Power source,one for microcontroller and another for driving motor with Driver IC.

Here,i have used ATMEGA32 micrcontroller and  Code is written in C  using AVR Studio 5.0.

Source Code

/*
* DCMotorControl.c
*
* Created: 4/1/2011 12:08:10 AM
*  Author: sfg
*/

#include <avr/io.h>
#include <util/delay.h>

int main(void)
{
DDRD=0xFF; //PORTD declared as output
PORTD=0x00;
DDRB=0x00; //PORTB as input
while(1)
{

//Pin 0 of PORTB high,then Moves Clockwise
//A–1–PD0
//B–0–PD1
//Enable–1–PD2
if(PINB==0x01)
{
PORTD=0x05;
//_delay_ms(5000);
}
//Pin 0 of PORTB Low,then Moves AntiClockwise
//A–0–PD0
//B–1–PD1
//Enable–1–PD2
else
{

PORTD=0x06;
//_delay_ms(5000);
}
}
}
Circuit Diagram

Stepper Motor Interfacing With Microcontroller

►Introduction

A stepper motor is a brushless, synchronous electric motor that converts electrical  pulses into mechanical movement. Every revolution of the stepper motor is divided into a discrete number of steps, and the motor must be sent a separate pulse for each step. The stepper motor can only take one step at a time and each step is the same size. Since each pulse causes the motor to rotate a precise angle, the motor’s position can be controlled without any feedback mechanism. As the electrical pulses increase in frequency, the step movement changes into continuous rotation, with the speed of rotation directly proportional to the frequency of the pulses. Step motors are used every day in both industrial and commercial applications because of their low cost, high reliability, high torque at low speeds and a simple, rugged construction that operates in almost any environment.

►Unipolar stepper motor
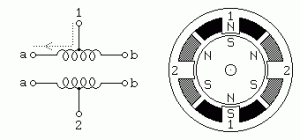
The unipolar stepper motor has five or six wires and four coils (actually two coils divided by center connections on each coil). The center connections of the coils are tied together and used as the power connection. They are called unipolar steppers because power always comes in on this one pole.

Unipolar Stepper Motor Windings

►Bipolar stepper motor
The bipolar stepper motor usually has four wires coming out of it. Unlike unipolar steppers, bipolar steppers have no common center connection. They have two independent sets of coils instead. You can distinguish them from unipolar steppers by measuring the resistance between the wires. You should find two pairs of wires with equal resistance. If you’ve got the leads of your meter connected to two wires that are not connected (i.e. not attached to the same coil), you should see infinite resistance (or no continuity).

Bipolar Stepper Motor windings

Stepper Motor interfacing with Microcontrollers

Stepper motors can be used in various areas of microcontroller projects such as making robots, robotic arm, automatic door lock system etc.Here,I will discuss different controlling types (Half step and Full step), Interfacing Techniques (using L293D or ULN2003) to control stepper motor.

Step Sequence

Stepper motors can be driven in two different patterns or sqeunces. namely,

  • Full Step Sequence
  • Half Step Sequence

►Full Step Sequence

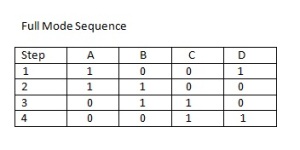
In the full step sequence, two coils are energized at the same time and motor shaft rotates. The order in which coils has to be energized is given in the table below.

Full Step Sequence

►Half Step Sequence
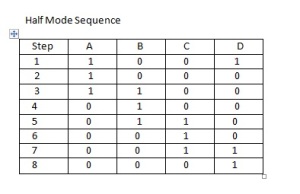
In Half mode step sequence, motor step angle reduces to half the angle in full mode. So the angualar resolution is also increased i.e. it becomes double the angular resolution in full mode. Also in half mode sequence the number of steps gets doubled as that of full mode. Half mode is usually preffered over full mode. Table below shows the pattern of energizing the coils.

Half Step Sequence

►Step Angle

Step angle of the stepper motor is defined as the angle traversed by the motor in one step. To calculate step angle,simply divide 360 by number of steps a motor takes to complete one revolution. As we have seen that in half mode, the number of steps taken by the motor to complete one revolution gets doubled, so step angle reduces to half.

As in above examples, Stepper Motor rotating in full mode takes 4 steps to complete a revolution, So step angle can be calculated as…

Step Angle ø = 360° / 4 = 90°

and in case of half mode step angle gets half so 45°.

So this way we can calculate step angle for any stepper motor. Usually step angle is given in the spec sheet of the stepper motor you are using. Knowing stepper motor’s step angle helps you calibrate the rotation of motor also to helps you move the motor to correct angular position.


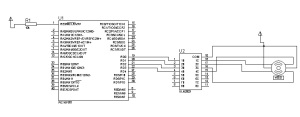
►Connecting Unipolar Stepper Motor with Microcontroller(PIC16F887) using ULN2003

Stepper Motor Interfacing with microcontroller Using ULN2003

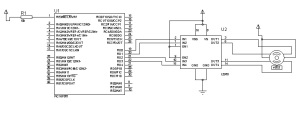
►Connecting Unipolar Stepper Motor with Microcontroller(PIC16F887) using L293D

Stepper Motor Interfacing With microcontroller Using L293D

Source Code

Here,I  have used PIC16F887  Microcntroller  and Code is written in C using mikroC PRO for PIC.Adjusting the delay will increase or decrease the speed of the motor. Here just for demonstration i have taken some delay, you can change it as you want.

►Programming Full step Sequence

void main() {ANSEL  = 0;                // Configure AN pins as digital I/O
ANSELH = 0;
PORTD = 0;
TRISD = 0;                 // Configure PORTD as output

while(1){
PORTD=0x09;
Delay_ms(500);
PORTD=0x0C;
Delay_ms(500);
PORTD=0x06;
Delay_ms(500);
PORTD=0x03;
Delay_ms(500);
}
}

►Programming Half step Sequence

void main() {

ANSEL  = 0;                // Configure AN pins as digital I/O
ANSELH = 0;
PORTD = 0;
TRISD = 0;                 // Configure PORTD as output

while(1){
PORTD=0x08;

Delay_ms(500);
PORTD=0x0C;
Delay_ms(500);
PORTD=0x04;
Delay_ms(500);
PORTD=0x06;
Delay_ms(500);
PORTD=0x02;
Delay_ms(500);
PORTD=0x03;
Delay_ms(500);
PORTD=0x01;
Delay_ms(500);
PORTD=0x09;
Delay_ms(500);

}
}